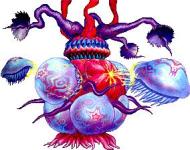
The Deku Tree - Boss - Queen Gohma - "Parasitic Armored Arachnid"

Strategy: When you enter Queen Gohma's domain, you'll hear the skin-crawling sounds of "something" rustling above you. Without warning, Queen Gohma drops from the ceiling, revealing herself as a giant armored arachnid.
When you run from Queen Gohma, she'll climb up the ceiling and drop Gohma Larvae down to attack you. Destroy the larvae before they hatch or they will become spiders. At any rate, when all three are defeated Queen Gohma will drop back down. As she approaches, target her eye and hit it with the Fairy Slingshot when it turns red to stun her. Run up and slash her eye to deal damage and Queen Gohma will return to the ceiling and drop larvae again. The pattern will repeat until Queen Gohma has been struck three or four times. If you run into some trouble, use the regenerating flowers along the walls.
After Queen Gohma has been destroyed, pick up the Heart Piece to increase Link's Heart Containers and completely replenish his health. Step into the blue ring of light in the center of the room to be returned to the outside world. Dodongo's Cavern - Boss - King Dodongo - "Infernal Dinosaur"

Strategy: Toss a Bomb into King Dodongo's mouth when he begins powering up his flame breath. When it explodes, it stuns the King and enables you to hit his head with your sword. Stand pinned against a wall or on a corner of the sloped section near the lava pit to avoid King Dodongo's roll. Eventually he will stop and charge his Flame Breath again, toss another Bomb in his mouth and repeat this strategy four times to defeat King Dodongo.
You receive a Heart Piece for your hard work. Pick it up and enter the blue ring of light to complete this section.
Jabu Jabu's Belly - Boss - Barinade - "Bioelectric Anemone"
Strategy: Keep your distance from this spinning boss. When you lock onto its center, attack and it releases all of the jellyfish surrounding it. Destroy the jellyfish first, if you don't, Barinade will regather them and start shooting electricity. Once all the jellyfish are gone, hit Barinade with the Boomerang to stun him and run up and slash him with your sword. It only takes four attacks of this type to destroy Barinade.
After defeating Barinade, you will receive a Heart Piece and Princess Ruto will be waiting for you.
Forest Temple - Boss - Phantom Ganon - "Evil Spirit from Beyond"
Strategy: When you walk up to the circular platform you'll be locked in, so prepare to battle Phantom Ganon.
Wait for the phantom to disappear into one of the six paintings. Watch the paintings carefully because images of Phantom Ganon on horseback will appear in two of them. Keep track of both of them, one will turn back but the other will emerge through the painting. The trick is to shoot him just as he makes it out of the painting. Repeat this three times to have Phantom Ganon come out in physical form. In his new form you must repel his magic beam back at him with your sword. Lock onto Phantom Ganon and wait till the beam is a swing length away and hack away. The beam will return to Phantom Ganon, but he will most likely hit it back at an even faster pace. Time your slashes to hit it back even faster, if he returns it again then keep it up. He will eventually miss and fall to the ground, quickly slash him several times before he gets up.
Repeat this tactic to defeat Phantom Ganon. Pick up the Heart Piece and step into the center blue light to be transported back to the Chamber of Sages. Saria is there and she gives Link the Forest Medallion. Link will be returned to the surface to meet the Deku Tree Sprout, who has sprouted near where the old Deku Tree once stood. Link discovers that once he defeated Phantom Ganon and cleared the Forest Temple, he freed the Kokiri Forest from the encroaching evil that Ganondorf had unleashed. With the evil lifted, the Deku Tree Sprout can now grow into the Great Deku Tree.
Fire Temple - Boss - Volvagia - "Subterranean Lava Dragon"

Strategy: Equip Link with the Megaton Hammer and when Volvagia pops up, hit it in the nose. Be sure to stand back a ways from the smoke that indicates Volvagia's coming because standing too close will cause damage to Link as Volvagia swings around violently. A successful hit will lay the dragon down and stunned, giving you an oppotunity to hit as many times as possible with the Hammer before it drops back down. When Volvagia reemerges it will start attacking with Fire Breath and then by dropping rocks on you, alternating each time you have hit it. Volvagia will also start trying to fake you out by causing steam to come up but then quickly switching to another hole. Wait till you see Volvagia pop up and then smash it with the Hammer again. Repeat this process for five turns to defeat the Lava Dragon.
After receiving a Heart Piece, Link will be returned to the Chamber of the Sages. Darunia will be there to thank you and introduce himself as the Sage of Fire. You will receive the Fire Medallion and Darunia will lend you his newly acquired powered.
Water Temple - Boss - Morpha - "Giant Aquatic Amoeba"

Strategy: When you enter Navi will warn you that the water is not ordinary water. Jump onto one of the middle platforms to have Morpha appear behind you. Quickly jump off to the outer ledge and wait for the nucleus to start swirling around. Move away from the water that is swirling because Morpha will stretch out to attack you. When this happens the nucleus will be exposed; use the Longshot at a distance to bring the nucleus out of the water. Hack away at nucleus when it pops out; 5-6 slashes will finish this boss. The water drains when the nucleus is no more, so pick up the Heart Piece at the bottom and step into the blue light.
After stepping into the light, Link is once again warped to the Chamber of Sages. Ruto emerges as the Sage of Water and tells Link that she has to stay and guard the Water Temple; Ruto still believes they are getting married. Link is then warped out to Lake Hylia for a talk with Sheik as the lake is refilled.
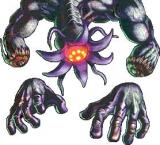
Bottom of Well - Boss - Dead Hand
Strategy: Dead Hand is actually made up of several parts. When you first face this boss, two rows of hands will sprout along the sides of the room. You can attempt to avoid them, but the easiest way to draw out the main part is to let one hand grab you for a brief moment. At this point, Dead Hand's body should appear; smash buttons like crazy to get away from his hand before Dead Hand's body reaches you. When you're free, aim for Dead Hand's head when it lowers. It will eventually run away, but let the hands grab you again and repeat the strategy. After this boss has been defeated, a treasure box appears with the Lens of Truth inside.
Shadow Temple - Boss - Bongo Bongo - "Shadow Beast of Yore"
Strategy: Once you are inside the room, equip your bow, normal shoes, the sword, and the Lens of Truth. Hop into the hole to begin the battle.
This is one of the more bizarre bosses in the game made up of a single eye and two ghastly hands. Bongo Bongo will bang his drum and have you dancing to his own beat. Avoid getting too close to the drum beats, if you are too close they will shoot you off the drum. Do not forget to have the Lens of Truth on or else you can't see Bongo Bongo's hands. Equip it and look for the hands, shoot them each once with an arrow and then look for his eye so you can give it pop too. When Bongo Bongo falls, run over and slash him with your sword. Stick on the out edges of the drum to keep your bounces low. Repeat the process until you have hit the eye 15 times and Bongo Bongo is defeated.
With the ghostly drummer put down, grab the Heart Piece and warp to the Chamber of Sages. Impa is there as the Sage of Shadow. She tells Link that Princess Zelda is safe and that he must go to Zelda with his newly acquired power from the Shadow Temple. Impa hands over the Shadow Medallion and pleas for Link to look out for the Princess in her place.
Spirit Temple - Boss - Twinrova - "Twin hags"

Strategy: Koume, with blue ice beams, and Kotake, with red fire beams, will attack alternatively. When one attacks, deflect the beam back at the other one; when Koume attacks, deflect the beam at Kotake and vice versa. Don't lock on or else you find yourself in a boggle trying to manuever the beam. After a few hits to each sister, they form into one boss -- Twinrova.
Lock on and face Twinrova. She'll shoot out Fire and Ice beams. Use your shield to absorb the ray. Absorb three of the same attack, when you do, hold your shield steady and you will fire a beam of the type and knock down Twinrova. To collect three you must do it in a row, meaning you cannot catch two fires, one ice, then another fire. When Twinrova falls, hop over and slash her with watch you got. Repeat until she is gone.
Pick up the Heart Piece and warp to the Chamber of Sages. Nabooru will greet you and give you the Spirit Medallion.
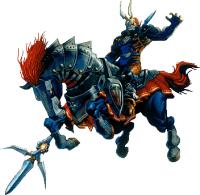
Ganon's Tower - Boss - Ganondorf - "King of Evil"

Strategy: Navi has been knocked away and cannot be used for Z-targeting. When Ganondorf fires an electrical charge, deflect it with Link's sword. Volley back and forth as you did with Phantom Ganon until Ganondorf misses. At this point, fire a Light Arrow at him so you can hop over and unleash a fury of attacks upon him.
Ganondorf's only other attack consists of a huge blob of black light that he lets build up before launching. When he begins to form the black mass, use a Light Arrow to counter the attack. This leaves Ganondorf open for attack yet again. Keep up the strategy to emerge as the victor of the fight
Ganon's Tower - Boss - Ganon

Strategy: When the fight begins, Ganon blows Zelda off the battleground. In the process, Link's Master Sword gets knocked away from him, preventing him from using it during part of the fight. Luckily Navi is a bit ticked off and isn't taking any crap from Ganon, so you can Z-target now. Make sure you have the Light Arrows equipped as well as the Biggoron's Sword or the Megaton Hammer. First, fire a well placed Light Arrow at Ganon's face. This leaves him stunned and open for attack, so get behind him and slash his tail. He is very quick to turn so be weary of lingering around back there.
When shooting arrows at Ganon's head, make sure you make a direct hit. The Longshot works too, but he is not stunned nearly as long. His sword can block the attacks, so just be sure it's a sure hit.
After a substantial amount of damage has been incurred, Ganon's attacks become much more fierce. Link gets the Master Sword back however, so unleash all you got on Ganon, Light Arrows and all. His attack pattern is the same, just faster; with enough patience and perserverance, Ganon will bite the big one for good.
Once Link defeats Ganon, Zelda and the six other Sages send Ganon into the void of the Evil Realm. The land is free at last from the grasp of the Gerudian madman.

